
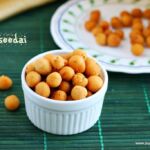
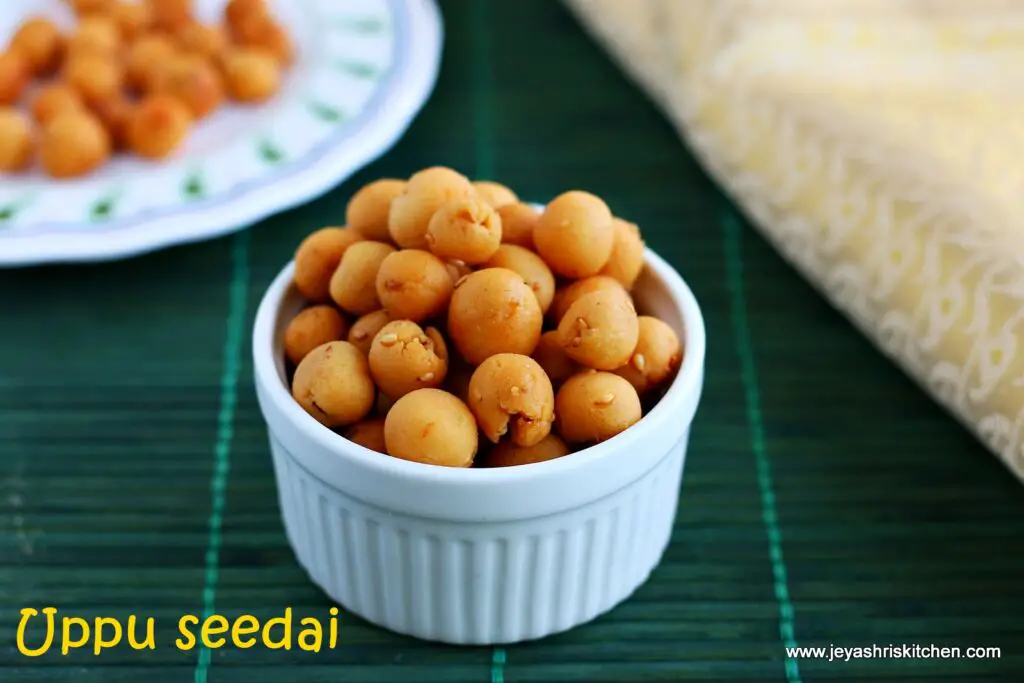
Uppu seedai | how to make uppu seedai – Seedai recipe with full video and step-by-step pictures.
Uppu Seedai we make for Gokulashtami and the festival is nearing I wanted to post the uppu seedai recipe , a traditional snack. I used to do this every year and the recipe I got from a Tamil magazine “Mangayar Malar” some 21 years back. I was a beginner at that time and saw that recipe in the magazine, basically they gave a lot of tips for beginners. Those days making STD phone calls to amma was too expensive. Being a newly married with zero experience in Bakhshanam making, I managed to do this with the help of the tips given in the book.
I could say it’s a huge success without bursting of single seedai. Later year after year I could perfect the same recipe. Till today I am following the same recipe and I can confidently make seedai without any fear. Vella seedai and uppu seedai, if you follow the recipe perfectly, you will surely get the perfect results.
Check out the Vella seedai recipe. Also, check out aval murukku, thattai, arisi murukku, and curd murukku.
Check out this post, where my mom explains the tips and tricks to make uppu seedai and vella seedai. Check out our collection of Janmashtami recipes
If you are a working mom or have a small kid around or have no time to do any elaborate dishes for neivedyam, check out these 5 easy janmashtami recipes.
Uppu seedai recipe
Ingredients
- 1 cup Rice flour
- 1 tsp Urad dal flour
- 1 tbsp Coconut grated
- 1 tsp Sesame seeds
- ¼ tsp Cumin | jeera
- 1 tbsp Softened Butter
- Oil for deep frying
- Coconut oil few drops optional
- Salt as needed
Instructions
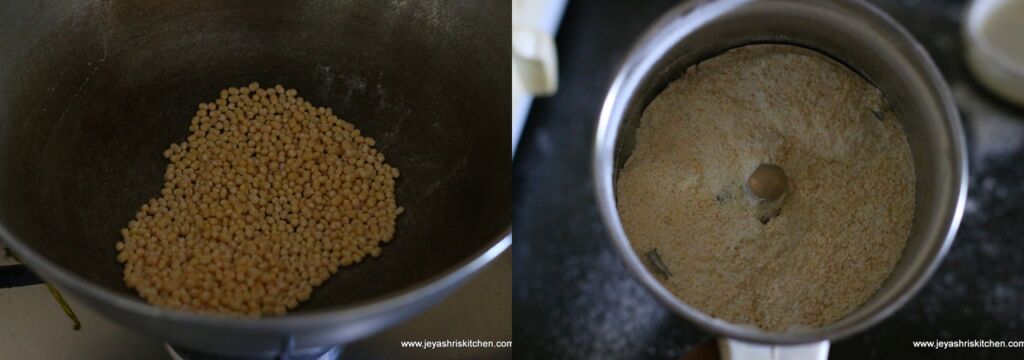
.For urad dal Flour:
- Dry roast 4 tbsp of urad dal in a pan
- Just roast till golden brown.
- When it is cool, make it a fine powder in a mixie.
Let's make seedai
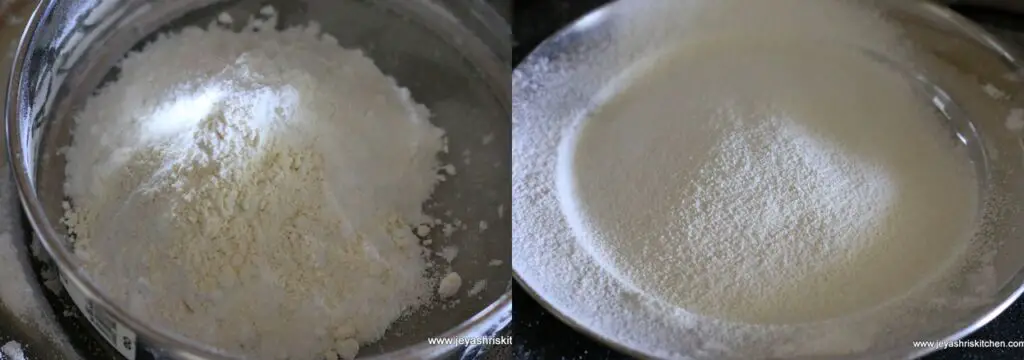
- Roast the rice flour and urad dal flour in a dry pan on a low flame. Be careful not to change the color. Roast for 1-2 mins.
- Sieve this flour and roast it again.
- Repeat this process twice.
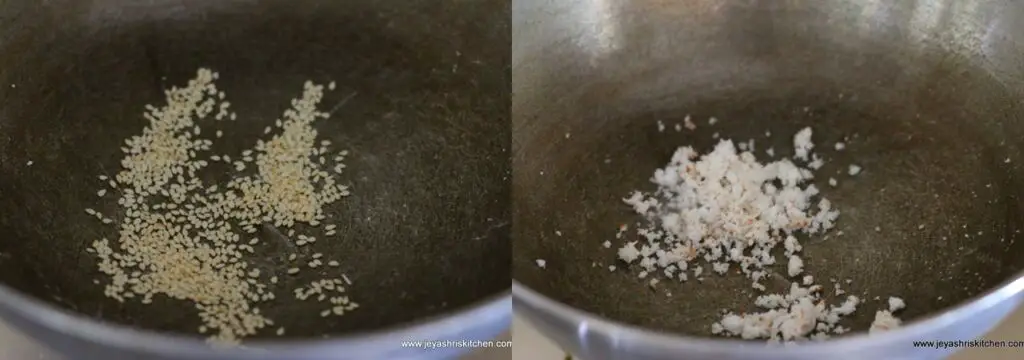
- In the pan add the sesame seeds and roast till slightly brown. roast the coconut also till golden brown.
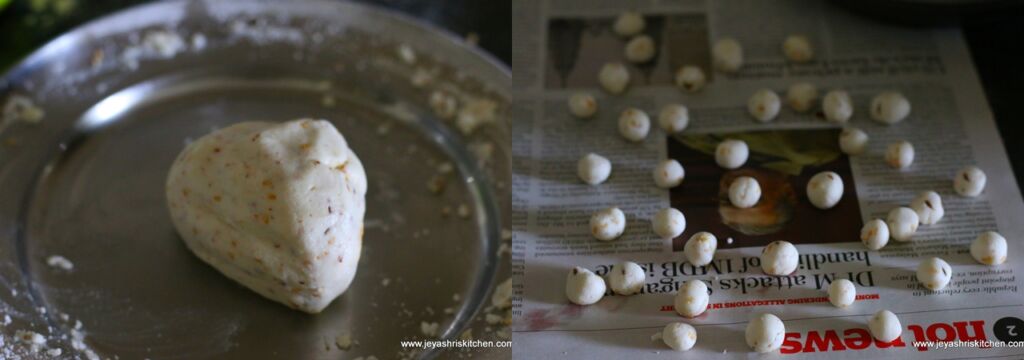
- In a wide bowl add the roasted flour, butter, cumin seeds (if adding, no need to roast) roasted sesame seeds, coconut, and salt. Sprinkle water little by little and make it into a smooth soft pliable dough.
- The dough should not be too tight. Otherwise, the seedai will get cracked.
- Make it into small balls by greasing your hands with coconut oil and spreading them on a newspaper.
- Do not roll them too hard, Just gently roll them and do not overdo them.
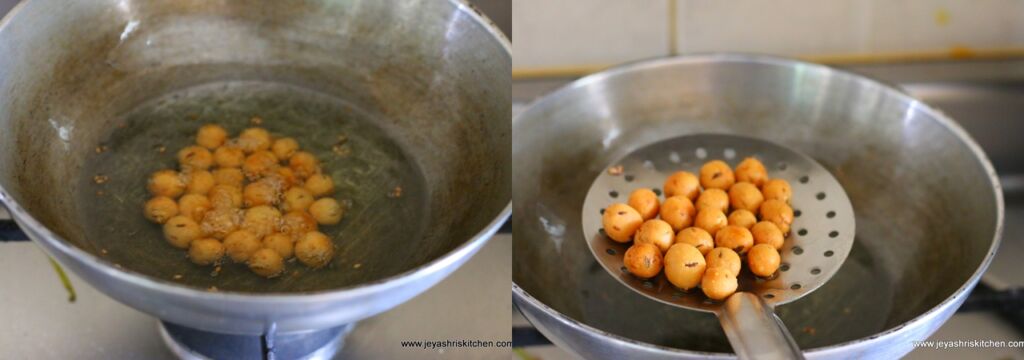
- Heat oil in a pan for deep frying.
- When the becomes hot, keep the flame at medium-low.
- Throw the seedai balls into the oil.
- Fry till the oil sound subsides.
- Take out from the hot oil and drain in a kitchen towel.
- Repeat the same procedure for the rest of the seedais.
Video
Notes
For urad dal Flour:
- Dry roast 4 tbsp of urad dal in a pan
- Just roast till golden brown.
- When it is cool, make it a fine powder in a mixie.
- Let’s make seedai.
- Roast the rice flour and urad dal flour in a dry pan on a low flame. Be careful not to change the color. Roast for 1-2 mins.
- Sieve this flour and roast it again.
- Repeat this process twice.
- In the pan add the sesame seeds and roast till slightly brown. roast the coconut also till golden brown.
- In a wide bowl add the roasted flour, butter, cumin seeds (if adding, no need to roast) roasted sesame seeds, coconut, and salt. Sprinkle water little by little and make it into a smooth soft pliable dough.
- The dough should not be too tight. Otherwise, the seedai will get cracked.
- Make it into small balls by greasing your hands with coconut oil and spreading them on a newspaper.
- Do not roll them too hard, Just gently roll them, and do not overdo them.
- Heat oil in a pan for deep frying.
- When the becomes hot, keep the flame at medium-low.
- Throw the seedai balls into the oil.
- Fry till the oil sound subsides.
- Take out from the hot oil and drain in a kitchen towel.
- Repeat the same procedure for the rest of the seedais.
- Always roast the flour and sieve them twice.
- While adding cumin seeds, sesame seeds, and coconut check whether all the impurities are removed. Even a small stone or dust particle will make the seedai burst.
- The seedai has to be fried on a medium-low flame, as this will make it cook them inside too.
- You can use store-bought rice flour too.
- Idiyappam flour will not work out well uppu seedais.


Seedai looks so flavourful n tempting…I am posting the same too 2mrw 🙂 Luv the bg, flowers, bowl and the seedai clicks very much
Adding jeera is new to me,we only add sesame,will try out this time, hope it comes out good 🙂 clicks are so pretty…
I love theese. We used to buy these all the time from bakeries 😀 Yumm 😀
wow seedai luks perfect… Wonderful presentation,clicks are amazing.
I love this …looks yum …nice clicks and Congrats on getting your domain 🙂
Nice post for gokulashtami. most people afraid abt its bursty nature. u made it perfect. i follow my MIL's method. it also comes out rite 🙂
Traditional and delicious recipe.. looks super perfect.. thanks for the recipe dear 🙂
Indian Cuisine
Good post for Krishnajeyanthi. Looks flavourful. Love it absolutely.
Cheers,
Uma
Great clicks I too posted same today. same pinch.
Seedai ..what a perfect and yummy snack to much on:-)this is my gramdma's specialty snack!!
perfect seedai…nicely presentation n lovely click pa!
Thank you Jeya shri for sharing this wonderful recipe. I just adapted the recipe from your blog and seedai came out perfect in shape and colour. Thank you so much once again as your measurements are always perfect. I am following your blog from 2011 and you always surprise me with your recipes and I never faced a situation like your measurements didn’t work well for any recipes i tried.
Tried it 2 – 3 times…But all the time flop…Scared to try it…But after seeing the pics…sure want to try again…Thanks…
Seedais look so yummy and perfect for any festival
Lovely step by step pics… great help for seedai making beginners like me 🙂
https://krithiskitchen.blogspot.com/
These are very yummy…but I have never tried it..bookmarking this..lovely clicks…
good one ..perfectly made..
Looks like all you girls are geared up for Gokulasthmi. Saw muruku at Rak's place but could not comment. Now, got tempted looking at uppu seedai 😀 Step wise pictures are very useful. We add waamu/omam seeds(ajwain) to seedai(dont remember a kannada name for it at this moment :P)!
All time fav for gokulashtami, never ate this other than my grand mom's prep n krishna sweets. Loved the vibrant pics jeyashri.
https://sanscurryhouse.blogspot.com
My fav anytime, feel like munching some..prefect looking seedais..
Uppu seedai looks so delicious! Super clicks too..
Looks so authentic. Looking forward to Krishna jayanthi.
perfect n lovely seedais….
https://panchamrutham.blogspot.com/
Seedai looks yummmmm! 😛
I have never tried making kai murukku or seedai before. I think this year i should try..LOoks perfect Jaishree
this looks wonderful delicious looking seedai
So tempting and loved those cute balls !!
Ongoing Event – CC-Appetizers
They look delicious n highly addictive ~ thanks for sharing this wonderful recipe!
USMasala
Perfect seedai to welcome lord krishna !! I never tried this may be this year I will!!Pictures are so tempting !!
beautiful looking seedai…love the crunch….
and very cute picks too!
Totally love this traditional recipe!!! Nice presentation 🙂
Prathima Rao
Prats Corner
Delicious one Jeyashri. Love the step by step pictures.
Good post for srijayanthi… Looks crispy
I just love seedai but very scarred that it will burst.
Nice pictures. Good to see the step by step illustration.
I love this. The step by step pics are great n the pics a fab looking.
always loved it dear… never tried it.. will surely do… bookmarked…
Dish Name Starts with J
Learning-to-cook
Regards,
Akila
perfectly made…looks yumm
Really perfect…I was searching for this recipe from long…will try it soon…thanks jeyasree for your recipes…tried your milk peda and it was just awesome.
Step by step pics and procedures is very helpful. Will try it ..
Can we prepare seeds With rice flour bought from the shop.
Yes you can do, nicely roast it as mentioned in the post.
I tried ur recipe for pal payasam. It's awesome.
What would be the measure of a cup and 1tsp?
Am gonna try this today evening and i need the exact measure because i want this to turn out well.. please reply asap
Sorry if I am late. My one cup is 200ml. Next time if you have any urgent queries please message me in Jeyashri's kitchen Facebook page.
Just tasted mine. Uppu seedai was perfect ?? something that I wanted to get it done the perfect way. Thank you so much jeyashri.
I always follow your recipe and get nice seedais. But they become soft after a few hours of making (though they are crisp until just a few minutes after I make them!) I’m unable to find what I’m doing wrong. Pls help !
Instead of butter can ghee be added ?
For murukku I have tried but never tried for seedai, So not sure about the outcome.
Thank you Jeya shri for sharing this wonderful recipe. I just adapted the recipe from your blog and seedai came out perfect in shape and colour. Thank you so much once again as your measurements are always perfect. I am following your blog from 2011 and you always surprise me with your recipes and I never faced a situation like your measurements didn’t work well for any recipes i tried. L
So happy to know, Thanks a lot deepa